Monday, November 12, 2012

It's Decorative Gourd Season!*

I'll be honest, I don't particularly like Thanksgiving. Turkey isn't one of my favorite things, and I actively dislike gravy, sweet potatoes, asparagus, olives, pecan pie, and weird pickles - which just so happen to be some of the staples at my family's traditional Thanksgiving dinner. The holiday seems to center around this food - well, this food and football. Even worse, the traditional color scheme of brown and orange just kind of bums me out. I will admit that some of the colorful turkey decorations can be cute, and I think it's adorable to see kids dressed up as pilgrims, but even that seems one sided. When I try wearing the Native American headdress I got at a post-Halloween sale, suddenly I'm irreverent and weird!

At the same time, I do love decorating for holidays. Usually, I just leave up my Halloween stuff until it's time to switch it out for Christmas, but if I happen to come across any nice items that would work well for Thanksgiving, I'm all for it.

So, when Kaitee, Kelly, and I found out that a nearby glass-blowing studio would be hosting a workshop in which we could make our own glass pumpkins, I was all on board. In the best interest of safety and workmanship, the trained professionals would be doing most of the difficult and dangerous portions of the pumpkin making, but we got to have our hand in it as well!

Take a look!

Before getting started, we had to choose our colors. Kaitee is checking out some of the other pumpkins trying to figure out what colors she wants to use.
 
First, we got to dip our glass blobs into the color powder! I wanted my pumpkin to be white.


Second, we rotated the blobs of glass over the fire, making sure to rotate them evenly so that they didn't melt into a weird shape.

This was the part where we stood by idly while the professionals did the real work of shaping the glass.

If I recall correctly, this guy has been doing glass-blowing for seventeen
years or something! Maybe eleven. I have a terrible memory
 
They used this pretty cool mold to give the glass a pumpkin shape.


Next, we got to inflate our own pumpkins. We all used the same hose, which I highly doubt was sanitary.

Finally, they added the stems.

After a few days, I was able to come pick up the finished product, because apparently it had to incubate or something.

I promise you that this picture does not do it justice.
Now, I finally have a decorative gourd!

*Click here for an article by someone who really loves decorative gourds. Warning: there is a lot of explicit language.


Friday, November 9, 2012

Enter at your own risk (Beware! This post is long and self-indulgent!)

With the exception of St. Valentine's Day, I don't think there is any holiday better suited to my interests than Halloween. There is just something about the idea of blood and guts and monsters and ghosts and witches and pranks and zombies and candy and mayhem that just really speaks to me. My absolute favorite is when Valentine's Day falls on a Saturday, making the day before Friday the Flirteenth. I'd like to say that it's because of a secret dark side I have or something, but let's be real, my dark side is still pretty cartooney.

More than anything, though, I especially love the costumes.

My college roommate and I used to start planning next year's costume on the day after Halloween. By the time October 1st rolled around, we had usually forgotten all of our brilliant ideas and were forced to start from square one, but we still had the spirit there. I was always very particular about the kind of costume I wanted. After some disastrous results in high school, I had sworn off doing the weird pun costumes (even though I just love lame puns). I also tended to avoid the bagged costumes, because I found them unimaginative (and expensive... and they could never really hit any middle ground between slutty and hideous... and weren't flattering anyway). Instead, I tried to make costumes that would be somewhat unique, recognizable, and homemade.

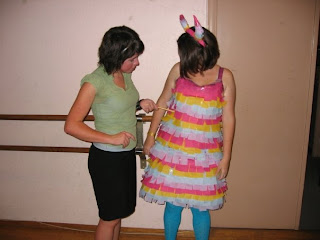
Junior year, I went as a pinata. It took me forever to attach each streamer to the dress. Then it took another forever to attach them to a new dress after I had taped everything too tight and broken the zipper on the first one. Weirdly, the most difficult part was finding devil horns to use as the pinata's bull horns. The only ones I could find were fluffy and glittery. Seriously, what is happening to the youth these days?

Downside? Packing tape really doesn't breathe

Senior year, I went as Mr. Peanut. I didn't know how to sew yet, so rather than even try to make a dress, I settled for just wrapping the fabric around me like a towel. Don't worry, I didn't run into any issues. My roommate let me borrow his cane, but I already owned the rest of the accessories for some reason.

The saddle shoes that you can't really see were part of my high school uniform.
I still wear them occasionally. They're the best.

Two years ago, I went as Toucan Sam. I had to tear apart a Viking helmet in order to make that mask, but it was worth it. I even used a box of Froot Loops as my purse that evening.


Last year, I went as Marvin the Martian. I only had to tear apart and paint a Spartan helmet for that costume, but I did make my own skirt. Although it may have been technically a tutu, this was the first time I had made my own clothing. In fact, it was the first time I had ever used a sewing machine. It was only a month later that I was begging for one for Christmas.


Which brings us to this year.

While I was still trying desperately to figure out what I wanted to be for Halloween, a friend of mine had had a brilliant idea. This friend, who will heretofore be referred as Jane Jetson, decided to go as (wait for it) Jane Jetson! She even found an amazing apron on etsy that would have been perfect. Unfortunately, before she said a chance to purchase said apron, it was sold to another. Knowing that I love crafting, recently got a sewing machine, and will work for free, she asked if I'd be able to make a replica (or at least a piss poor attempt at one). Excited, I agreed.

This is the original, professionally made apron. I was not
confident in my ability to live up to that.

Jane Jetson Costume


Materials:

-Sparkly purple fabric
-Light purple fabric
-White fabric
-White ribbon - approximately 1.5" thick
-White ribbon - approximately 0.75" thick


First, I started by cutting large circles in both purples (making the darker purple circle a little bit smaller). Actually, I folded the fabric a couple times and cut quarter-circles to make things easier on myself. Then, I cut out a circle in the middle for the waist.

This picture isn't technically from this step, but it gets the point across.
Next, rather than hem the bottom of the dark purple fabric, I decided to line it with ribbon. I used the thinner white ribbon, pinned it in place, and sewed it on.


After repeating the process with the lighter purple fabric, I attached the two circles at the waist and sewed them together.


With that, the skirt portion was finished.

For the bodice, I cut out a basic apron-esque shape with a sweetheart neckline. I'll be honest, I had no idea what I was doing at the time, and still don't really. But I cut the shape out of each purple, layered them, attached them to each other, and hemmed the edges regardless. Then, I pinned it to the skirt, added a temporary neck tie, and tried it on. Even though Jane Jetson and I are different sizes, I had no choice but to fit the bodice to me because I was making it up as a went along. After modeling it in the mirror for a while, and stabbing myself with a million pins (I guess that's why people use dress forms), I finally was able to cinch in the bodice to make it more fitted.

I may have forgotten to get pictures of this process for Jane's costume.
That's why this bodice is pink rather than purple.
Then, I took a long piece of white fabric and folded it in half. I sewed the edges together, flipped it inside out, and ironed it flat. It was about 2.5" thick and long enough to loop around my waist and tie in front. This would act as the main apron tie. I pinned this piece and the bodice to the skirt and sewed them all together.

It was at this point that I broke the needle in my sewing machine. I didn't even know that was a thing that could happen! I didn't know you could (or apparently should) replace those! So, after a minor freak-out, I picked up some replacements from Walmart, figured out how to change it out, and continued on my way.

My sewing machine has been such a trooper lately.
Then, I attached the thicker white ribbon to the bodice to act as the halter neck tie.The last things I needed to add were the neckline pieces and the pocket.

For the neck-line pieces, I took two pieces of white fabric and attached them to each other using iron-on adhesive. I did this to make them stiffer so that they'd maintain their shape. I then cut out two triangles and attached them to the neck.

The pocket is basically a square of fabric that was lined with ribbon and sewn onto the skirt.

Doesn't my friend make a great Jane Jetson?!


Now that her costume was finished, I decided to use the exact same method to make my own costume, with a few modifications, of course.

Daisy Duck Costume


Materials:

-Glittery hot pink fabric
-White fabric
-Pink ribbon - approximately 1.5" thick
-White ribbon - approximately 0.75" thick


I used the same basic methods as above to make the Daisy Duck costume.
-Same basic circle skirt, except with white fabric and no ribbon lining.
-Same basic bodice, except with hot pink fabric and white ribbon lining in lieu of the neckline triangles.
-Same waist tie, except with hot pink fabric.


When I was done with the basic apron, however, rather than add a pocket, I decided to cut out almost 200 tear drops from the white fabric and sew them on in layers. I think it gave the apron the duck look I was going for.

Yeah, I'm pretty sure that's blood on the tear drop. My blood.
From stabbing myself with pins so many times.


All I needed was a boa, a duck-call, and a hot pink hair bow, and I was ready to go!

 
Hannah went as a jazzerciser. Kirsten was the Sun Drop girl from those commercials.
We made a lot of jokes about duck face that night.

I think I might start making aprons for all of my future costumes. The up-side is that making an apron with a full circle skirt eliminates the need for zippers or buttons. The down-side is that an undershirt is pretty much mandatory.

WHILE I CRAFTED: I watched basically everything, because the two aprons combined took forever (although I might have actually napped or cleaned during some of these movies as well... who knows)
-Clue
-Shaun of the Dead
-Young Frankenstein
-Beetlejuice
-Hocus Pocus
-The Corpse Bride
-Alien
-The Addams Family
-Death Becomes Her
-I Married a Monster from Outer Space
-Dracula: Dead and Loving It
-Countless episodes of the Munsters (seriously, this show was amazing)
-and many more that I can't think of now


Friday, October 12, 2012

In our town of Halloween...

In the spirit of the season, my friend Hannah invited a few of us to her place this past weekend to carve pumpkins and watch Halloween movies!

Hannah absolutely loves carving pumpkins, and as a result, decided to splurge a bit this year on some pretty neat tools. Whenever I've carved pumpkins in the past, I've always used those somewhat crappy, cheap sets that always break about halfway through. Not Hannah; she had these really nice scoopers that meant that I barely had to touch the gross pumpkin pulp at all (incidentally, that was one of the best parts about having Matt as one of our roommates in college - he would do all the gross pumpkin work and let us decorate it). Hannah also got a hot knife, which is apparently a thing. It's basically just a crafting scalpel that you plug in, but it makes the carving process much easier. Academy Award Winner Sandra Bullock** commented that it was very convenient, because when he inevitably cut himself, it would automatically cauterize the wound. 

Hannah carved out Oogie Boogie from the Nightmare Before Christmas.


Academy Award Winner Sandra Bullock carved the Planet Express logo from Futurama.


I decided to carve out The Monarch from the Venture Bros. He's probably my favorite character on the show.


Now all three...


I had mentioned to Hannah that by carving them so early, they'd all be rotten come Halloween. Hannah pointed out that that was her plan all along, because she wants to have multiple carving nights. Hooray!

WHILE WE CRAFTED: We watched The Little Shop of Horrors and Underworld (well, I may have fallen asleep during Underworld, but that's neither here nor there).

**Actual name has been changed to protect the identity of my friend


Wednesday, October 3, 2012

To Boldly Go Where No Cupcake Has Gone Before

I'd just like to preface this by saying that yes, I am kind of a nerd. Good. I'm glad we have
that out of the way.

So last Friday, a few of my friends got together to watch some of our favorite episodes from Star Trek: Voyager. We had planned on it being more of a drinking game (where we'd drink whenever Captain Janeway ordered her standard "coffee, black" or whenever Tuvok tried mind-melding with something, for example), but it turns out that we didn't have nearly enough rules and somehow chose the only episodes where none of their recurring antics took place. Whatever.

Anyway, after planning the event, we realized that it also happened to be our friend Matthew's birthday! So, at the insistence of Academy Award Winner Sandra Bullock*, I made Star Trek cupcakes!

Red for Command, yellow for Engineering, and Green for Science/Medical

I was just really happy with how they turned out and wanted to show everyone.

WHILE I BAKED: I watched Grimm, actually, but am now super upset because they took season 1 off of Hulu+.

*Some actual names have been changed to protect the identity of a friend of mine.


Friday, September 28, 2012

This is Halloween, Everybody Make a Scene!

Ever since my friend Nikki moved back to town, we've been trying to get together semi-regularly for random craft nights! So far, we've had two.

At the first, we made a bunch of flower pens for her to bring to work. She just started her first year as a teacher, and she wanted to have pens available for her students to use while in class that they wouldn't walk off with.

Sadly, this is the least-grainy picture from that adventure.
 
At the second, this past Sunday, Nikki wanted to paint, and paint we did!

Unfortunately, I kind of totally forgot it was happening, so I hadn't even brainstormed about what I'd want to paint. Once we pulled out the canvases and paints (just because I was unprepared doesn't mean I didn't have a ready supply of craft supplies), I drew a blank.

Nikki had come with a plan (she wanted to do a tree and birds silhouette thing) and began painting immediately, while I just sat staring at my blank canvas. Then I realized that it was almost October, so of course I had do paint something for Halloween! Duh!

Keeping in theme with last year, where I went kind of bat crazy with my decorations, I decided to paint a moonscape featuring bats! And because I usually like my paintings to have a 3-D aspect to them (partially because I think it's fun and partially because I think it distracts from the fact that painting isn't actually my forte), I glued on a glittery felt bat in the corner!


It's very simple, and something that a child could have done, but I absolutely love it!

Nikki, however, was not as lucky. Due to the fact that I have a pretty sparse supply of paints and colors, her tree and birds thing wasn't quite working out as planned. She ended up deciding to scrap the whole project and paint over all of it in black. We started brainstorming on what she could do with a black canvas, and I joked that she should just put some googly eyes on it. Then we decided, non-jokingly, that she should totally just put some googly eyes on it!

We actually had to make a trip to Michael's to get some googly eyes for this one... not because I didn't have any (I had an entire craft drawer full), but because I didn't have a good variety of sizes. Afterwards, I texted my good friend, Academy Award Winner Sandra Bullock**, to let him know that after getting some craft supplies, all of my googly eyes wouldn't fit into my googly eye bin... because he's always joking that rather than first-world problems, I keep having first-grade problems.


I liked hers so much that I decided to make one too!

I just love the eyebrows.

Also, Nikki painted another canvas with polka dots.


We tend to make a bit of a mess.

And now that it's almost October, I feel like it's time to start putting up all my other Halloween decorations, too!

WHILE I CRAFTED: We actually didn't listen to or watch anything. I guess we just hung out and talked? Weird...


**My friend asked that I not use his name on my blog. "Academy Award Winner Sandra Bullock" is the pseudonym that he (yes, he) chose to protect his identity.

Monday, September 24, 2012

A simple re-upholstery of bar stools

Everyone wallows a bit differently. When going through a rough time, some people curl up with a pint of ice cream and a sad movie. Others prefer vacations or shopping sprees. My college roommate would sautee spinach and nap. Me? I like the very specific diversion of assembling furniture. Not building furniture, I don't know how to do that, but assembling it.

That's why when I was feeling low a while ago, I spent a great deal of time at Target perusing their home furnishings section. I ended up coming home with 3 new bookshelves (all of which I probably didn't actually need), and two of their Julia Bar and Counter Stools!


The bookshelves have actually proven to be very useful (because I have far too many books and movies) and surprisingly actually fit into both my old and new apartments (albeit after days of feng shui in each), but it's the bar stools that I really love. They're perfect height for the island in my kitchen, swivel around, and have comfy cushions. Still, though I hate to admit it, I always thought they were fairly ugly. The brownish-creamish color scheme was just not working for me. It didn't match a thing in my apartment! Granted, nothing in my apartment matched a single other thing in my apartment... but I'm working on that.

In an attempt to make the bar stools a bit more aesthetically pleasing, I finally recovered them a couple months ago!

Weirdly enough, this was yet another simple project that basically boiled down to stapling things together.


RE-UPHOLSTERING BAR STOOLS

What you'll need:

-About a yard of fabric - Actually, I bought about 6 yards of fabric at once, because I had a few different projects going on at the time, so I may be wrong about only needing about a yard of fabric. You've been warned.
-Pliers
-Screwdriver (both Flathead and Phillips)
-Scissors
-Staple gun and staples
-Hammer


How to do it:

(1) Start by using your screwdriver (Phillips, probably) to remove the cushions from the stools.

I forgot to take pictures during the process, so let's
just pretend that this was the old cushion...
When you flip over your cushion, you'll see some net/mesh-like fabric covering the bottom. I just tore this off and threw it away, never to think of it again. Others might have kept it intact to re-attach later or would have attached new netting. I didn't find that necessary.

(2) Next, remove all the staples you see. There will be a ton.

When removing the staples, I found it helpful to use a Flathead screwdriver (with a very thin tip) to dig underneath the staples and then kind of lever them up so that they were no longer against the surface. I then used pliers for the actual extraction process.

Side note: After removing all the staples from the first cushion, my wrist was really hurting me because I had used wrist muscles I had no idea I had, I guess. So for the second cushion, I wore my carpal-tunnel wrist guard (which, well, the fact that I even have a carpal-tunnel wrist guard might have also explained my wrist pain), and found that it was much easier.

The most important part of this step, though, is to watch out for spiders. I apparently had a spider living inside one of my cushions. It crawled on my arm. After I screamed and ran away, I was forced to take a long break from the project as I tried to get enough courage to go back into my living room. I'm not saying that all cushions have spiders living in them, but let's be real, all cushions totally have spiders living in them.

(3) After all of the staples are finally removed, and you are finished recovering from the traumatizing experience of having a probably harmless arachnid in your general vicinity, remove the existing fabric from the cushions.

(4) Using the old fabric as a template for the new fabric, cut out two circles from the new fabric - one for each bar stool - and be sure to give yourself an extra inch or two of fabric on the border, just in case.

Usually, people use a heavier upholstery fabric, but since I bought mine for multiple projects, I just stuck with regular cotton material. I figured that even if it did wear out, it'd be easy enough to replace again (also, non-upholstery fabric is much less expensive... assuming you're not using silk or diamond-laced gold thread or anything).

Also, after seeing this pattern, I could hardly resist.
(5) Staple away.

Once you've cut the new fabric, attaching it is just a matter of pulling it taut and stapling like a mad-man (or if you're like me, a mad-woman)! I have an electric staple gun that I got from Home Depot, and it makes this process way easier. I recommend just stapling away until you are comfortable that the fabric is secure.


Keep in mind that the staples may not end up flush with the surface of the cushion. In fact, I don't think they ever will (unless it's just that I'm doing something wrong with my staple gun specifically). I ended up using my hammer to push the staples into the stool the rest of the way.

(6) Using your screwdriver (or whatever you used in step 1), re-attach the cushions.

And there you go!


I used this project as a sort of introduction to furniture re-upholstery. Next, I'm going to attempt recovering these old dining room chairs I stole out of my parents' attic (with their permission). I'm ultimately working up to recovering an old wing-back chair and ottoman that my mom got in a garage sale.

WHILE I CRAFTED: I watched Star Trek: Voyager.

Wednesday, September 19, 2012

Framed Hair-Clip Holder (with some hair-clips included)

Earlier, I mentioned that I would show in-depth tutorials on how to staple things together. Despite the fact that I had meant it as a joke, that's exactly what I'm about to do. Why? Because that's really all it takes to make this framed hair-clip holder!


I generally don't wear many accessories (with the notable exceptions of my Aggie ring and tattered, Velcro watch), so when I want to spice up my ensemble, I usually default to a hair-clip of some sort. Unfortunately, I'm pretty dang lazy and scatter-brained, so if they're not easily accessible and right in front of me, I tend to either forget about them entirely or just decide to forego them on the grounds of not wanting to bring down, open, dig through, then put away the box of hair-clips I keep in my bathroom cabinet.

In an attempt to remedy the situation, I thumb-tacked a ribbon to the wall and just hung all of my clips and barrettes on it. While functional enough, it was pretty white-trash-tastic. Then, when browsing Pinterest, I saw a much better solution, and decided to try it myself!

FRAMED HAIR CLIP HOLDER

What you'll need:
  • Empty frame - I got mine at Hobby Lobby. They also have lime green and purple ones.
  • Ribbon - Try to use one of the sturdier fabrics. I usually love satin ribbon, but decided to go with a stronger type for this project for the sake of structural stability.
  • Staple gun and staples
  • Hammer
How to do it:

It's incredibly easy to do. Basically, just staple the ribbon to the back of the frame. I spaced my ribbons about 3.5" apart on center, but it doesn't really matter. Do what works for you.


If your staple gun is like mine, the staples will probably still stick out a bit from the surface of the wood (I'm guessing this is because they sometimes are used to hold wires and stuff in place). I just used my hammer to hit them in the rest of the way. And then you're pretty much done.

I hung mine in my bathroom. I think it looks great with the
flamingo picture Hannah gave me a few years back.
Then, just attach your hair-clips and you're ready to accessorize away!

What's that? You don't have any hair clips and/or are extremely jealous of mine?
Definitely the latter, right?


I mean... they go with everything! Even Batman masks!
*Photo courtesy of Walquist Photography
Well, fear not, dear citizens! I've got you covered.

FLOWER HAIR-CLIPS

What you'll need:

Fake flowers
Hot-glue gun and glue sticks
Alligator clips or Barrettes
Pliers with wire-cutting capability


Oh, and a novelty Halloween cup of Diet Dr. Pepper. That's key.
How to do it:

Start by selecting which flowers you want to make into a clip. I recommend flowers that lay somewhat flat, such as daisies or sunflowers, rather than more shapely flowers, like lilies and rose buds.


Then, remove the flower stem and backing. Because there are wires in most fake flower stems, use the wire cutters rather than scissors. Cut them as close to the base of the flower as possible.


Because the green backing is usually what holds the flower together, put a dollop of hot glue at the base of the flower to hold everything together. Note: if your flower is still lacking in structural integrity, try spot-welding between the different petal layers with hot glue.

Finally, attach the alligator clip (or barrette) with more hot glue. It's important here to position the clip correctly. I like to position it so that the tip of the clip is in roughly the center of the flower, and the open/close lever is near the edge of the middle portion - just before the petals start branching out on their own.


It's also important, when hot-gluing the clip in place, to fully encase the rounded top of the clip in hot glue (so that stray hairs don't get caught underneath) without covering the alligator teeth or accidentally gluing the clip in a permanently closed position.

Let the glue cool, and voila!


ALTERNATE USES:
If hair clips aren't really your thing, you could use clothespins to attach small pictures to the ribbons in the frame and use the flower clips as decorative items around the house.


WHILE I CRAFTED: I listened to my Kate Nash station on Pandora.