Friday, April 12, 2013

Pillows!


I just want to start off by saying that Pinterest is amazing. Browsing the DIY & Crafts section has given me so many great ideas on how to spruce up my apartment, and the ideas are usually accompanied by in depth tutorials (thank goodness). 

For example, check out this amazing tutorial that Elizabeth over a E Tells Tales pinned on how to make bow pillows!


Realizing that my couches were in desperate need of some decoration (or really, that my face was in desperate need of something to rest on when I slept on the couch - which was regularly), I decided to make a couple of these pillows last fall.

Does the fabric look familiar?
(Hint: it's the same as the bar stools I recovered)
I won't bother re-typing the steps here (as Elizabeth really does an amazing job of breaking everything down), but I will note that when I was buying my pillow forms, I actually bought them a size smaller than what the tutorial calls for (accidentally). Fortunately, the entire process is so simple that it was pretty easy to adjust accordingly. 


After basking in my bow-pillow-making glory, I decided to use the same concept to make a couple more pillows for the couch in my bedroom (I'd like to say that I have a couch in my bedroom because I'm so fancy and chic, but really, it just didn't fit in my living room and looked  stupid in my dining room). 

This time around, I ran into an issue with my sewing machine. I'm pretty sure it was on some sort of drug (because you know inanimate objects and their drug problems), because it kept going rat's nest insane with the thread. 

Thusly
I'm pretty sure it's because I threaded it wrong or something, though, because after re-threading it, I didn't have anymore issues. 

I also decided to forego making bows this time around. Instead, I affixed some iron-on fabric adhesive to some fabric (obviously), cut out a few flowers and petals, and ironed them all onto the pillowcases. 

Make note of the fabric used for the flowers - we'll be seeing that again.

I really like how they turned out, aesthetically. Unfortunately, they don't make for the most functional of pillows. After having slept on them a few times (yes, on the even smaller couch that is next to my bed - no, I don't know why I'm a crazy pants), some of the flowers are starting to fall off. I probably should have tack-sewn them in place after ironing them on to the pillows (is that a thing?), but I was pretty lazy an unpracticed at the time. Now, I'm even lazier, so I'll probably just let them be for a while then use some fabric glue to re-affix them later. The flowers aren't coming off completely, mind you, just detaching themselves at the edges. 

So comfy!
In any case, I'm actually surprised I was able to pull it off. After finishing them, I spent the next couple months annoying all of my friends and house guests by over-enthusiastically pointing them out over and over again. I'm pretty obnoxious. 

WHILE I CRAFTED: I watched Star Trek: Voyager


Sunday, April 7, 2013

Sugar Galore!


Sometimes, I am blessed to find that I have an entire day to myself with no plans. These days are few and far between, but Saturday just happened to be one of them. I mean, I had plans to go to the Easter Vigil mass that night, needed to run a few errands in preparation for my family's Easter brunch the next day, and opted to sleep in a bit rather than go to my Jazzercise class, but still... that left me roughly 9 hours where I was both free and awake. I can't even remember the last time that happened! 

Rather than clean my car (both the inside and outside desperately need it), finally take down my Valentine's decorations, put away my clean laundry (which has been piling up for weeks - I'm pretty good about having clean clothes, but terrible at putting them away), reorganize my kitchen (I recently got some new bar-ware that won't fit in the cabinets and is taking up valuable counter space), mop my kitchen floor (which is currently is covered with a fine layer of goo), finally make some pillows for Kirsten (they were supposed to be her Christmas gift, but I haven't gotten around to making them yet - I'm the worst), Windex the physics homework and sentence diagrams off my mirror (my friends are pretty cool at parties), or put away any of the crap (figurative crap) that is covering my dining room and bedroom, I opted to spend the day doing the least helpful but still technically productive thing I could imagine: making cookies. 


Which I now need to cheer me up after typing
out that list of stuff I still need to do.


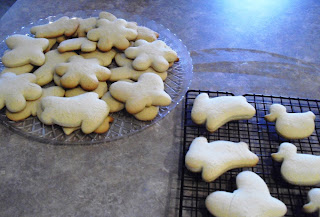
Even though my brother-in-law is lactose intolerant and my parents are usually on some crazy diet, I thought it would be fun and festive to make sugar cookies for our Easter Sunday brunch! 

I've always loved the idea of decorating cookies (it's why I have an entire drawer of cookie cutters), but have never been able to make a batch that didn't taste terrible. At best, my sugar cookies would be edible but bland and just not worth it... and I don't even want to talk about at worst. My chocolate chip cookies are usually pretty tasty, and I can make a mean carrot cake cupcake, but something about the sugar cookies would just go terribly awry every time. 

Until recently, that is. 

In December, I went to a St. Nicholas Day party that was having a baking contest. I didn't participate, but my friend Augusta brought these amazing sugar cookies. They were delicious and had this awesome thin frosting on them. I don't remember who won the contest, but those cookies should have taken the cake (ha!). After I probably creeped her out by being a little too into the cookies, she was nice enough to give me the recipe! Even better, she was also nice enough to allow me to share the recipe with you!


Augusta's Sugar Cookies
Makes about 5-6 dozen (Unless you make yours extra thick like me... then you get about 3 dozen)

Ingredients:
  • 1 cup butter
  • 1 cup sugar
  • 3 eggs
  • 3 3/4 cups flour
  • 1/2 tsp. salt
  • 1 tsp. baking soda
  • 2 tsp. cream of tartar
  • 1 1/2 tsp. vanilla
Directions:
  1. Cream together butter and sugar.
  2. Add eggs and vanilla; blend well.
  3. Sift (or whisk) together flour, salt, soda, and cream of tartar.
  4. Add the flour mixture gradually to creamed mixture.
  5. Chill dough.
  6. Roll out to 1/4 inch thickness on floured pastry cloth. Cut with cookie cutters.
  7. Bake 6 to 8 minutes at 425 degrees F.

This was my second time making these cookies, and this new recipe has served me very well. I especially liked this batch, because unlike last time, I didn't burn any of them (one of my cookie sheets is permanently covered with heart-shaped scorch marks from when I used the very bottom oven rack)!


Hmm... something is missing. I guess it's time to dress them up!

Frosting

Ingredients:
  • 2 cups confectioners sugar
  • 1 tsp. vanilla
  • Dash salt
  • Heavy cream
Directions:
  • Combine the sugar, vanilla, and salt.
  • Beat cream in gradually until frosting reaches the desired consistency.
  • Augusta's Notes:
    • It takes about 2-3 batches of frosting per cookie recipe, depending on how much frosting you use.
    • Even a few drops of food coloring can make the frosting runnier, so you might want to leave it a little stiffer than you'll ultimately want so that it works out once you mix in the colors.
My parents gave me these, as well as a cake decorating kit, for my birthday last year!
The icing takes color really well (I've never been able to get such nice blues or blacks when working with store-bought cake icing), and spreads really smoothly. Also, it's pure sugar, so that's pretty awesome.


Quack!

Attention potential suitors: daisies are my favorite flower.
Daisies and roses. 

A small sampling of the whole lot.

After I finished decorating all the bunnies, flowers, ducks, and other bunnies, I still had a fair amount of icing left over. As a result, I may have gone overboard decorating the last butterfly I had.

The Mighty Monarch!
I just love monarch butterflies, mostly because I love the Monarch on the Venture Bros. 


"You see, just like the flawless monarch butterfly from which I take my name,
the Monarch has many ways to sting."

WHILE I CRAFTED: I listened to my She & Him Pandora station.


Wednesday, April 3, 2013

Taking the Plunge!

When I moved into my first apartment after college (about three years ago), my parents let me rifle through their storage unit for furniture. This was the ideal solution for everyone, because they didn't want to pay for a storage unit anymore, and I didn't want to have to buy a bunch of furniture. I totally got the better end of that deal (especially since they then had to help me haul it across Texas, then haul it back when I moved back to Dallas - my parents are the best). Between that and the couches my sister gave me (she had gotten married only a few months beforehand, and they decided to keep her husband's set instead), I had a pretty sweet setup. 

There was only one problem: everything was hideous. 

Actually, that's not true. The tables, lamps, and pedestals look great, and the only thing hideous about the couches are the recent stains from where I dropped a red popsicle or fell asleep while eating. 

"I fell asleep watching the movie Amelie, and when I woke up,
I had spilled so much red wine on myself that I thought for a second I had been shot"


The two dining room chairs, however, looked terrible... and still do, in fact. They're this awful puke gold with puke green overlay that has stains on them that are probably also puke (unconfirmed). I mean, there is a reason they were out in storage. For the first year or so, I talked about replacing them, but over the past year, I've thought "why replace them when I could recover them for so much cheaper?!" 

Same story for the wingback that was in storage. Mom got it four years ago at a Second Chance sale that her company hosts. It's a flowery red color that she absolutely hates (hence why it was in storage), but it's really comfortable and amazing. I actually like the coloring, but it clashes with every single thing in my apartment, so it's time for that to go as well. 

So, for the past year, I've been planning on recovering these three chairs. I even did a test-run by recovering my bar stools, but I've been scared to take on these larger projects. I spent months stalling (and called it called "research"), but I've finally taken the plunge and bought the fabric. 


I'm really excited about the butterfly fabric that I got for the dining room chairs. I'm just worried about how easily it might stain. Well, I would be worried if not for the fact that I usually eat dinner sitting on the floor in front of my couch (I'm pretty good at being a grown-up).

I bought this from fabric.com!

However, If I'm being honest, I'm a little worried about the fabric I got for the wingback. I had planned on just doing a solid magenta with white piping, but it was pointed out to me that a solid color (especially one that isn't that dark) would show stains, wrinkles, etc. really easily. I'm sure it'll be fine, but I'm just kind of nervous. 


Also purchased from fabric.com. Less than $8 a yard! 

All the fabric should be coming in early next week. Want to take bets on how long I'll stall before actually starting the re-upholstery?


Thursday, March 28, 2013

I really need to get my apartment back in order...


About a week ago, a friend came over to spend the afternoon with me. Upon walking into my apartment, he exclaimed that I really needed to clean up and put all of my Valentine's Day decorations away... being that it was now late March. Actually, he said that before even coming in, because I still had my Valentine's Day wreath on the front of my door (I say "had" as if it has since been removed... it hasn't... it will likely hang there proudly until either the 4th of July or Halloween). But looking around, I realized that yes, my apartment looked ridiculous. 

Don't get me wrong, I absolutely love Valentine's day decorations (hot pink and hearts are my jam), so some of them won't come down until I decorate for my birthday in August (let's be honest, I'll probably keep some up for that, too). But even I'm not so tacky to leave up all of my decorations all year (mostly because I don't have that kind of wall space). It's just that I've been super busy the last few months (hence the lack of posts), and have had no motivation to put what little time and energy I had into making my apartment blander (although I had no problem finding motivation to decorate in the first place, obviously).

Before I start to take them down, though, I thought I'd take this opportunity to show off some of the decorations I was able to manage for Valentine's day this year! I'd show off the Christmas ones, too, but I packed them up in late January... so that will have to wait until next year. 

Light-up heart wreath


This is one of the tackiest things I've ever seen, so obviously I had to buy it (on clearance sale after Valentine's day last year), and hang it up in my apartment. I don't know what it is, but something about this makes me so happy. In person, it looks a lot redder and slightly less weird. 


Paper heart chain


I saw this one on Pinterest sometime last year, and it's really easy to make.

1) Cut thin strips of paper.
2) Fold each strip in the middle.
3) Curl the two ends inward to make a heart shape.
4) Before stapling the ends in place, insert the folded edge of the next paper in the chain. 

See? Easy!

Paper heart garland


This one was pretty time consuming, but turned out to be the perfect craft for when I was home sick for two days last month. Whenever I wasn't sleeping on the couch (and I slept on the couch a lot those couple days), I was lounging on the couch mindlessly making this garland while watching Star Trek (the original series - I'm pretty cool). 

1) Cut out a bunch of heart shapes (and I do mean a bunch). I used a cookie cutter as a stencil. 
2) Glue two heart shapes together with a bit of string or yarn running in between them. 
3) Marvel at how awesome it is.

Balloons


Obviously, I didn't make these. But, I did pick them up from Party City on February 16th (I had a Valentine's Day party that night). They had probably been blown up on Valentine's day. These pictures were taken today. It's been about a month and a half and these balloons are still going strong. Granted, they are starting to wither, but barely... and only very recently. 

That's amazing. 

Oh, also, I found out how to deflate them so that I can reuse them next year! (Use a straw.)

Heart tree


I actually made this last year for Valentine's day. I love it so much that it has a somewhat permanent residence on my bedroom wall, but I moved it to the living room for the holiday. 

1) Use a heart shaped hole puncher to cut out a lot of tiny hearts.
2) Paint a tree trunk on a canvas.
3) Mix Elmer's glue and water to make a thinner glue (or not, whatever). 
4) Glue each heart to the canvas. I used a paint brush.
5) Optional: Maybe use some sprayable fixative or gloss coat to the finished product. I didn't, but I always wonder what it would be like if I had. 
6) Also option, cut a fake frame out of cardstock (or just heavier paper). I had to do that, because the canvas looked really small and awkward without it.


Robo-Valentine


The robot was actually a Christmas gift from a friend. I decided to add the hearts to the eyes and tape a flower to his hand to make him more festive. I think I'll keep him like this all year round. 


Tablecloth


I got this during the post-Valentine's day sales at Target last year. Unfortunately, last year, I had a giant rectangular table, and this year I have a small circular one, so I had to cut it up to fit a bit. Under normal circumstances, I wouldn't show off a tablecloth, because that's kind of boring, but I just wanted everyone to take a look at my table. It looks like the table of a 4 year old girl. I didn't realize how silly that looked until I was putting away The Very Hungry Caterpillar game the other night after playing it with my friend, Mark. That's when I realized that there wasn't a single thing on my dining room table except for children-themed or heart-covered items. I have no children and live alone. This is insane. The bath-time bubble machine in the back is what really clenches it. 


Pin the heart of the giraffe poster


Because my party was after Valentine's day, I found a couple super-discounted classroom games that I made my friends play. We played this and Valentine's bingo. I had prizes for them and everything. It was awesome. 


I had a few other decorations up at the time, such as a vase full of conversation hearts (which were surprisingly hard to find at the stores), and a six pack of clear bottles that I had transformed into a cute, ribbony M&M holder, but those were either eaten or thrown away shortly after the party. I mean, I'm not so lazy that I leave food out for months... sometimes. 

I'll probably take these down this weekend... although now that I think about it, I probably won't with it being Easter and all. Oh well, I'll take them down eventually. Then, maybe, I'll show off some of the other improvements I'm trying to make to the place!


Monday, November 12, 2012

It's Decorative Gourd Season!*

I'll be honest, I don't particularly like Thanksgiving. Turkey isn't one of my favorite things, and I actively dislike gravy, sweet potatoes, asparagus, olives, pecan pie, and weird pickles - which just so happen to be some of the staples at my family's traditional Thanksgiving dinner. The holiday seems to center around this food - well, this food and football. Even worse, the traditional color scheme of brown and orange just kind of bums me out. I will admit that some of the colorful turkey decorations can be cute, and I think it's adorable to see kids dressed up as pilgrims, but even that seems one sided. When I try wearing the Native American headdress I got at a post-Halloween sale, suddenly I'm irreverent and weird!

At the same time, I do love decorating for holidays. Usually, I just leave up my Halloween stuff until it's time to switch it out for Christmas, but if I happen to come across any nice items that would work well for Thanksgiving, I'm all for it.

So, when Kaitee, Kelly, and I found out that a nearby glass-blowing studio would be hosting a workshop in which we could make our own glass pumpkins, I was all on board. In the best interest of safety and workmanship, the trained professionals would be doing most of the difficult and dangerous portions of the pumpkin making, but we got to have our hand in it as well!

Take a look!

Before getting started, we had to choose our colors. Kaitee is checking out some of the other pumpkins trying to figure out what colors she wants to use.
 
First, we got to dip our glass blobs into the color powder! I wanted my pumpkin to be white.


Second, we rotated the blobs of glass over the fire, making sure to rotate them evenly so that they didn't melt into a weird shape.

This was the part where we stood by idly while the professionals did the real work of shaping the glass.

If I recall correctly, this guy has been doing glass-blowing for seventeen
years or something! Maybe eleven. I have a terrible memory
 
They used this pretty cool mold to give the glass a pumpkin shape.


Next, we got to inflate our own pumpkins. We all used the same hose, which I highly doubt was sanitary.

Finally, they added the stems.

After a few days, I was able to come pick up the finished product, because apparently it had to incubate or something.

I promise you that this picture does not do it justice.
Now, I finally have a decorative gourd!

*Click here for an article by someone who really loves decorative gourds. Warning: there is a lot of explicit language.


Friday, November 9, 2012

Enter at your own risk (Beware! This post is long and self-indulgent!)

With the exception of St. Valentine's Day, I don't think there is any holiday better suited to my interests than Halloween. There is just something about the idea of blood and guts and monsters and ghosts and witches and pranks and zombies and candy and mayhem that just really speaks to me. My absolute favorite is when Valentine's Day falls on a Saturday, making the day before Friday the Flirteenth. I'd like to say that it's because of a secret dark side I have or something, but let's be real, my dark side is still pretty cartooney.

More than anything, though, I especially love the costumes.

My college roommate and I used to start planning next year's costume on the day after Halloween. By the time October 1st rolled around, we had usually forgotten all of our brilliant ideas and were forced to start from square one, but we still had the spirit there. I was always very particular about the kind of costume I wanted. After some disastrous results in high school, I had sworn off doing the weird pun costumes (even though I just love lame puns). I also tended to avoid the bagged costumes, because I found them unimaginative (and expensive... and they could never really hit any middle ground between slutty and hideous... and weren't flattering anyway). Instead, I tried to make costumes that would be somewhat unique, recognizable, and homemade.

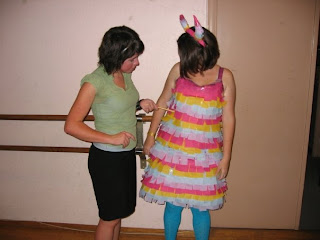
Junior year, I went as a pinata. It took me forever to attach each streamer to the dress. Then it took another forever to attach them to a new dress after I had taped everything too tight and broken the zipper on the first one. Weirdly, the most difficult part was finding devil horns to use as the pinata's bull horns. The only ones I could find were fluffy and glittery. Seriously, what is happening to the youth these days?

Downside? Packing tape really doesn't breathe

Senior year, I went as Mr. Peanut. I didn't know how to sew yet, so rather than even try to make a dress, I settled for just wrapping the fabric around me like a towel. Don't worry, I didn't run into any issues. My roommate let me borrow his cane, but I already owned the rest of the accessories for some reason.

The saddle shoes that you can't really see were part of my high school uniform.
I still wear them occasionally. They're the best.

Two years ago, I went as Toucan Sam. I had to tear apart a Viking helmet in order to make that mask, but it was worth it. I even used a box of Froot Loops as my purse that evening.


Last year, I went as Marvin the Martian. I only had to tear apart and paint a Spartan helmet for that costume, but I did make my own skirt. Although it may have been technically a tutu, this was the first time I had made my own clothing. In fact, it was the first time I had ever used a sewing machine. It was only a month later that I was begging for one for Christmas.


Which brings us to this year.

While I was still trying desperately to figure out what I wanted to be for Halloween, a friend of mine had had a brilliant idea. This friend, who will heretofore be referred as Jane Jetson, decided to go as (wait for it) Jane Jetson! She even found an amazing apron on etsy that would have been perfect. Unfortunately, before she said a chance to purchase said apron, it was sold to another. Knowing that I love crafting, recently got a sewing machine, and will work for free, she asked if I'd be able to make a replica (or at least a piss poor attempt at one). Excited, I agreed.

This is the original, professionally made apron. I was not
confident in my ability to live up to that.

Jane Jetson Costume


Materials:

-Sparkly purple fabric
-Light purple fabric
-White fabric
-White ribbon - approximately 1.5" thick
-White ribbon - approximately 0.75" thick


First, I started by cutting large circles in both purples (making the darker purple circle a little bit smaller). Actually, I folded the fabric a couple times and cut quarter-circles to make things easier on myself. Then, I cut out a circle in the middle for the waist.

This picture isn't technically from this step, but it gets the point across.
Next, rather than hem the bottom of the dark purple fabric, I decided to line it with ribbon. I used the thinner white ribbon, pinned it in place, and sewed it on.


After repeating the process with the lighter purple fabric, I attached the two circles at the waist and sewed them together.


With that, the skirt portion was finished.

For the bodice, I cut out a basic apron-esque shape with a sweetheart neckline. I'll be honest, I had no idea what I was doing at the time, and still don't really. But I cut the shape out of each purple, layered them, attached them to each other, and hemmed the edges regardless. Then, I pinned it to the skirt, added a temporary neck tie, and tried it on. Even though Jane Jetson and I are different sizes, I had no choice but to fit the bodice to me because I was making it up as a went along. After modeling it in the mirror for a while, and stabbing myself with a million pins (I guess that's why people use dress forms), I finally was able to cinch in the bodice to make it more fitted.

I may have forgotten to get pictures of this process for Jane's costume.
That's why this bodice is pink rather than purple.
Then, I took a long piece of white fabric and folded it in half. I sewed the edges together, flipped it inside out, and ironed it flat. It was about 2.5" thick and long enough to loop around my waist and tie in front. This would act as the main apron tie. I pinned this piece and the bodice to the skirt and sewed them all together.

It was at this point that I broke the needle in my sewing machine. I didn't even know that was a thing that could happen! I didn't know you could (or apparently should) replace those! So, after a minor freak-out, I picked up some replacements from Walmart, figured out how to change it out, and continued on my way.

My sewing machine has been such a trooper lately.
Then, I attached the thicker white ribbon to the bodice to act as the halter neck tie.The last things I needed to add were the neckline pieces and the pocket.

For the neck-line pieces, I took two pieces of white fabric and attached them to each other using iron-on adhesive. I did this to make them stiffer so that they'd maintain their shape. I then cut out two triangles and attached them to the neck.

The pocket is basically a square of fabric that was lined with ribbon and sewn onto the skirt.

Doesn't my friend make a great Jane Jetson?!


Now that her costume was finished, I decided to use the exact same method to make my own costume, with a few modifications, of course.

Daisy Duck Costume


Materials:

-Glittery hot pink fabric
-White fabric
-Pink ribbon - approximately 1.5" thick
-White ribbon - approximately 0.75" thick


I used the same basic methods as above to make the Daisy Duck costume.
-Same basic circle skirt, except with white fabric and no ribbon lining.
-Same basic bodice, except with hot pink fabric and white ribbon lining in lieu of the neckline triangles.
-Same waist tie, except with hot pink fabric.


When I was done with the basic apron, however, rather than add a pocket, I decided to cut out almost 200 tear drops from the white fabric and sew them on in layers. I think it gave the apron the duck look I was going for.

Yeah, I'm pretty sure that's blood on the tear drop. My blood.
From stabbing myself with pins so many times.


All I needed was a boa, a duck-call, and a hot pink hair bow, and I was ready to go!

 
Hannah went as a jazzerciser. Kirsten was the Sun Drop girl from those commercials.
We made a lot of jokes about duck face that night.

I think I might start making aprons for all of my future costumes. The up-side is that making an apron with a full circle skirt eliminates the need for zippers or buttons. The down-side is that an undershirt is pretty much mandatory.

WHILE I CRAFTED: I watched basically everything, because the two aprons combined took forever (although I might have actually napped or cleaned during some of these movies as well... who knows)
-Clue
-Shaun of the Dead
-Young Frankenstein
-Beetlejuice
-Hocus Pocus
-The Corpse Bride
-Alien
-The Addams Family
-Death Becomes Her
-I Married a Monster from Outer Space
-Dracula: Dead and Loving It
-Countless episodes of the Munsters (seriously, this show was amazing)
-and many more that I can't think of now